Showing posts with label Vegetarian. Show all posts

Thursday, 16 July 2015

Cacao Strawberry Pancakes


I whipped up these pancakes last week as I needed a filling breakfast that felt naughty but was actually good for me...

They are made with half buckwheat and half brown rice flour which means 1) protein 2) fibre and 3) gluten free goodness..

And because I wanted them to be truly scrumptious... I added cacao and fresh strawberries. Boom! Winning combination!

It doesn't take longer than 5 minutes and these are a great option as a pre workout breakfast, say an hour before or a post workout brunch ( ideally you'd want to eat within half hour of training to help muscle recovery).

So what do you need and how do you make these yummy pancakes?

INGREDIENTS

1/2 cup buckwheat flour

1/2 cup brown rice flour

2 tsp baking powder (or use 3 tsp arrow root instead)

1 tbsp ground linseeds ( anti inflammatory plant omega 3 action)

2 tsp cinnamon ( helps balance blood sugar)

2 tbsp raw cacao (antioxidant action and energy fuel)

1tsp vanilla extract

2 tsp honey (or raw honey)

1 egg

1 cup almond or any other unsweetened dairy free milk

1/2 cup sliced strawberries

coconut oil ( I use a cold pressed one from Lucy Bee) for frying in the pan

Toppings

Smooth Almond butter (no added sugar)

a few more sliced strawberries

HOW TO DO IT....

It's very complicated...Pop all the ingredients in a bowl and mix till get a smooth batter, about 30 seconds. I know, are you sweating yet?

Heat up a tablespoon of coconut oil in the pan, then use a ladle and pour a little bit of your mix in, don't fill the ladle to the top, do half otherwise you won't be able to fit many pancakes in at the one time..

When they start to bubble on the top, flip them over and leave for another minute. Place them in your favourite plate, add some more coconut oil if you haven't got much left in the pan and pour more batter till all your mix is gone.

I made these pancakes today as well, and 6 came out  but that's because I made three in the shape of Mickey Mouse head...Yes, 36 years old and that's what makes me happy...

So if you make regular medium sized round pancakes you'll probably get 8 or 10 out of this.
Stack them up and sprinkle with more strawberry slices and swirl around some almond butter too for extra flavour, texture and protein.

I can honestly say they taste delicious and the protein content keeps your tummy fuller for longer!

So there you go, enjoy this guilt-free treat. From me, to you.x

Saturday, 26 October 2013

Butternut Squash a' la Kitty.x


This recipe is dedicated to my friend Kitty, one of the loveliest girls I know.
She seems to like butternut squash so this one's for her.
I love autumn, the colours, the new beginnings, Halloween..So many incredible reasons to be smiling, but mostly : IT'S SQUASH SEASON!!! All the wonderful shapes and sizes and colours at the farmers market bring me so much joy...And believe it or not, this year was the first time I actually roasted my own squash. I know, it's crazy.But we just moved to this wonderful new house with a proper oven in our cozy kitchen  and I thought the time had finally come.
So I went and bought two lovely  delicata squash and made some autumnal magic..now, this is a recipe that you can prepare even if you have a superbusy life I can assure you, all I have been doing for the past three weeks is working on my essay but these beauties were roasting while I studied, the sauce took 10 min to cook and the polenta about 1 min.Not bad ah?
Give it a try and you won't regret it. Happy Autumn to you all!!!

INGREDIENTS

2 small delicate squash
1 cup of gluten free instant polenta ( but you can use regular one)
3 organic tomatoes
10 small organic chestnut mushrooms
A little pic
A pinch of nutmeg
A drizzle of extravirgin olive oil

Preheat your oven at 190c, gas mark 5, 375F.
Wash the outside of your squash, cut the top and bottom and place it vertical on a cutting board and slice it in half  lengthwise.Make sure it's nice and stable before you make the cut and put your weight on it. Scoop the seeds out from both halves, sprinkle with a little nutmeg and place with the inside part facing down on a roasting tray. Cover the tray with foil to keep the heat inside and make the squash delicious and soft then go back to study ( in my case..) or do anything else you need to.
Your squash will need about 40 minutes.
10 minutes before taking them out of the oven, dust and slice your mushrooms,wash and slice your tomatoes and put everything in a pan with a little olive oil and salt and pepper on a medium heat.just stir the vegetables every now and then and in 10 minutes your sauce will be ready!

2 min before your sauce is done just boil water in the kettle and then use 1 mug and a half of boiling water and add to that half a mug of polenta while storing slowly, add salt and pepper.

Take the squash out, turn them with the inside part up and add a little polenta and the tomato and   muhrooms sauce on top of that.
Serve ideally with some lovely greens as a side. Buon Appetito!

Xxx

Valentina

Saturday, 20 July 2013

Corn Penne with Cherry Tomatoes and Courgettes (Gluten Free)


Last night both me and Patch got home relatively late and hungry so I whipped up something fresh and satisfying in 20 min flat!
I had some leftover courgettes from the farmers market, garlic (always a staple in our home and possibly the most powerful natural antibiotic out there!), then all we had to buy were cherry tomatoes.We got a £1 bag from Sainsburys as we were low on money but if you can, do get some bright red juicy ones possibly from a farmers market. I also got my "stash" of corn pasta from my last trip to Italy and penne were our choice for dinner.
This dish was so good we literally cleaned our plates!

RECIPE (serves 2)

1 pack of fresh cherry tomatoes chopped in quarters (just to let you know, I also chopped 1 medium organic tomato that was left in my fridge and needed to be eaten)

2 cloves of garlic chopped in teeny tiny pieces

2 small courgettes cut in 4 lenghtwise (picture below) and then thinly sliced

1-2 tbsp Extravirgin olive oil

salt and pepper to season

1 pack Penne Gluten Free Corn Pasta (the brand I used is called Le Veneziane)


Get a pan , pop in all the ingredients (except the pasta!) and turn the stove on to medium heat.
Cover with a lid and stir every now and then for 20 min.

As the sauce is cooking and your kitchen is filling up with a gorgeous smell,  put some salt in a pot and bring water to a boil ( to speed up the process is boil my water in a kettle and then add it to the pot so when I turn the heat on it boils straight away. Lazy much?), add your pasta of choice in and cook according to instructions on the packet.
I always try a bit of pasta about 1 or 2 min before the time ends just to double check if it's ready before the instructions said.
Once your pasta is cooked, drain it, add it to the pan with your vegetables and mix well.
I normally keep some of the boiling water should the pasta get a bit dry when drained but in this case, probably because of the water content of both vegetables that's released during cooking, I really didn't need to.
You can add some parmesan cheese if you wish.
Sit down and enjoy.x


Monday, 3 June 2013

The "Everything's gonna be alright" Risotto with Butternut Squash


 It's on days like today that I wish I had a dog to welcome me home with his cute funny face, ready to go for a walk in the park helping me to forget all the bad things that happened during the day..
But alas, I have no dog (sad music in the background).. So I'm turning to comforting yet nutritious food instead.
Enter the Butternut Squash Risotto.
This creamy, soul healing comforting bowl of goodness takes only 20 minutes to prepare and it's bound to bring a smile of happiness and joy on the first bite.
It's inspired by the awesome pumpkin risotto my mom makes but here it's easier to find butternut squash so I used that. And I'll tell you more, I used to have mixed butternut squash and sweet potato together but now I just use the first one and the result is a lighter, creamier risotto that I could eat over and over again.
And I love its happy bright orange colour of course!


INGREDIENTS
2 cups of chopped butternut squash
( I buy the pre chopped one and chop it even more)
1 cup arborio rice
1tbsp vegetable stock
2 peeled garlic cloves
2 tsp extra virgin olive oil
Salt and pepper to season
2 pinches of nutmeg
Boiling water


 Start with oil and garlic in a pan on medium heat till the garlic is browning a bit.
In the meantime put the kettle on and chop your butternut squash.
Get your rice and rinse it.
Once the garlic is ready, pop the butternut squash and rice in and mix so they are covered in garlicky oil.
Add salt and pepper and the vegetable stock and mix again.
Then add the water till it covers everything and bring to the boil before lowering the heat to a simmer.
From now on, what you want to do is check and stir every now and then, adding water if you notice that the mixture is becoming too dry.
After 15 minutes (my rice takes about 20 min. to cook but check the instructions on your package), I start squashing the pieces of softened squash against the sides of the pan with a wooden spoon and then stir, by the end of this process everything has become creamy and orange!
That's when I add my nutmeg, stir again, taste to check if I need more salt and pepper and if the rice is cooked of course.
When you stir the rice and see a creamy consistency, not watery (in Italy we call the right consistency ALL'ONDA, onda means wave in italian because when you stir the risotto it should look like a velvety wave), then it's done!
You can add parmesan if you want but as you know I haven't been a fan of dairy lately so I take mine without and it tastes so incredible anyway..

So nothing left to do but cuddle up on the sofa with your bowl of risotto and relax.
Everything's gonna be allright.x

Sunday, 26 May 2013

Carrot & Courgette Fritters


Today marks the end of Vegetarian Week, during which I have been able to test different recipes including the one that made it to this post.
I'm really trying to use up all of my leftovers lately cause I used to waste way too much food, so on Thursday evening I looked online for a meal that would include some mixed veg and eggs..I found many veggie fritters recipes but in a way or another I always needed to change a few ingredients so decided to make up my own.
In my fridge I still had a bag of beautiful organic carrots from the Islington Farmers Market, 1 courgette, some spring onions, parsley and two eggs. And that's how the magic happened.
When sauteeing or frying I'm now using coconut oil instead of olive oil as it isn't as damaged or chemically altered by heat as olive oil is.
Also coconut oil smells fabulous and contains lauric acid which strengthens the immune system.
Not bad  right?
The fritters came out really good, colourful and super tasty. I think I made at least 12 which meant two whole dinners with a side salad each.  Yummy dinners + money saved=  awesomeness.
So here's the recipe which, as I'm posting it today (Sunday), you can easily make tomorrow evening as your Meat Free Monday dinner baby!


INGREDIENTS (please choose organic when possible)

2 Large Eggs, beaten
1 Courgette, grated
2 Carrots, grated
1 Tbsp Nutritional Yeast (for a cheesy flavour without dairy plus mine is fortified with vitamin B12!)
1 Handful of chopped parsley
3 Spring onions, finely chopped
Salt & Pepper to season
1 Tsp coconut oil for frying
4 heaped Tbsp of gluten free flour or whole wheat flour ( I used gluten free)

Grate your courgette, carrots (I'm lazy so I let the food processor with grater attachment do the work) then put them in a colander and push them down to drain any extra liquid.
Finely chop your spring onions and parsley.
Put your vegetables in a bowl, add the remaining ingredient and mix well.

Spoon the coconut oil in the pan and turn on the stove to medium heat than start adding spoonfuls of the mixture (I managed to fit 4 spoonfuls at a time in my pan) and lightly push on top of each to form a patty.

Leave it 4-5 min. on each side or till they become golden, then transfer to a plate on top of kitchen paper (to absorb extra oil) and once the first layer is full add and extra sheet and pop the second batch on etc...

How easy is that? I made everything in 20 minutes. And so will you. Enjoy your dinner.x


Sunday, 12 May 2013

The Ice Kitchen

Here's my latest most wonderful discovery.
Last weekend the weather was finally pretty warm here in London and as me and my beau were wandering around the Real Food Festival on the Southbank, we noticed a colourful new stand we had never seen before..
Enter The ice Kitchen.
The sign reads Hand Made Ice Lollies and had pictures of multicoloured  popsicles with wonderful mouthwatering flavour combinations. Many I had never seen before. I HAD TO TRY IT.

I had a Raspberry and Lime lolly and Patch had a Strawberry and Cream (which seems to be one of the most popular flavours).
By the time we were done we both had pretty big smiles on our faces, the amount of real fruit you can taste when biting into these lollies is amazing and it's exactly what's going to bring me back this stand for more.


Cesar (chef and joint founder) explained to me that he does add a little sugar syrup (equal parts of water and sugar) " in minimal amounts just to take the edge off the more sour fruits" which seems more than fair to me.
He also said that one of the most special flavours he makes is 50's Orange a: sour based creamsicle, flavoured with orange juice, dipped in white chocolate and sprinkled with candied orange zest!
Are you drooling yet?
Just in case you wanted to keep it 100% natural then you should know that a sugar free Fresh Mango Pop is available and  I am definitely going to try it next time I head to the market.
And after that I'll try the Tart Plum (with roasted yellow and red plums) and after that...
Well, I could stay here all day  listing all the amazing flavours I want to try but I have a whole summer to work my way through all these incredible Artisanal Ice Lollies.


I used to have ice lollies a lot during the hot summers I spent in Italy but they were always the commercial, almost fluorescent ones that would only taste of sugar with some more orange, lemon or mint tasting syrup added in.
Don't get me wrong, at the time I didn't really care but right now I'm always looking for something a bit special, something that makes my taste buds go MAMMAAAAAAA MIAAAAAAAAAAA!!!
Which is why I had to write this post.

So next time you're on the Southbank on a weekend and the sun is out, take a stroll  over
to The Real Food Market on The Southbank Centre Square, just behind The London Orchestra and find this gem of a stand.

The Ice Kitchen will be at the Real Food Market every weekend starting May 18th.

See you there.x


Saturday, 4 May 2013

Easy Raw Wrap


I've been meaning to write a post about this quick lunch to go because I've had a few weeks where I was working at the film school almost every day and just couldn't afford to buy lunch on each single occasion, also I do prefer to make lunch myself if I can, that way I know exactly what kind of ingredients go in it.
I normally do this wrap in the morning, it takes 5 min tops and it's healthy delicious and satisfying.
The avocado is added in at the last minute, so you take it with you whole and I always have with me a spoon and knife (reusable ones) to cut it and spoon it out before adding it to my wrap.


INGREDIENTS  (makes two big wraps)
1 ripe Avocado
1/2 Cucumber thinly sliced ( probably less than that, use what you can and munch on what's left like I do)
1 Tomato thinly sliced
Hummous (bought from a shop, I use sainsburys organic hummous, or you can make your own)
2 Handfuls mixed salad (or whatever you have in the house ex: watercress or spinach)
Wholewheat large tortillas (I use discover Wholemeal Wrapbread, but you can get corn tortillas or any other kind you'd rather use, just make sure they are large otherwise it'll be hard to fold them with the filling in)


Now, it's all about layering! Spread some hummous first leaving a few cm from the border, otherwise it'll get messy when you roll it, add a little salad, then half cucumber slices and tomatoes, finally roll it and put it in your airtight container or lunchbox. Same thing with the other one.

As I said before all you have to do before eating is unroll, add half avocado in one wrap and half in the other then roll up again and bite into it!x


Tuesday, 23 April 2013

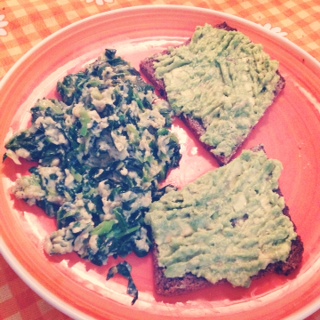
Happy Scrambled Green Eggs and Smashed Avocado on Rye


I'm writing about this tonight as I've just come home from a lovely spring day filled with new headshots and quality time with my beau and I now realised I haven't got many ingredients for dinner..Oops.
But I do have eggs and one avocado. So I'll have a simpler version of the recipe you'll see below.
I eat this a lot. I love eggs, I love spinach and I ADORE avocado so I really can't go wrong here.
 I normally have it for lunch after a late morning workout or on a Sunday for brunch accompanied by a glass of orange juice (not from concentrate!) but to be honest I could easily have it at any time of the day, like tonight for example.
Eggs are a really good source of protein and avocado, you probably already know, contains vitamin E which is great for your skin and its fat is mostly monounsaturated which is good for you, definitely better for you than saturated fat from processed food.
Now get cooking!

Serves 2:

4 Eggs (possibly free range and organic)
2 Big handfuls of chopped spinach (I add a bit more as I really love it)
1 Thinly Sliced Red Onion or 1 Small Leek
2 tsp Extravirgin Olive oil
Salt and pepper to season

On a low heat, drizzle the oil in the pan and add the chopped onion or leek stirring every now and then till soft.
In the meantime, crack the eggs in a bowl, season with salt and pepper and whisk.
Once the leek is soft, add the chopped spinach and stir for about 30 seconds, till spinach becomes slightly wilted and a beautiful bright green.
Now it's time to add your eggs! And make sure you keep stirring slowly so they don't stick to the pan.
The trick is to take them off the heat when they're still a little runny as they'll cook for a few seconds more even in the plate.

SMASHED AVOCADO

1 Ripe Avocado
1 tsp Extravirgin Olive oil
salt and pepper
A little lemon juice to taste

Spoon the avocado flesh out and into a bowl, add the lemon and oil and smash till smooth, add salt and pepper to taste.

You can toast your rye bread or have it just like it is and then spread you green creamy goodness on it, pop on a plate with the eggs and eat!


Friday, 5 April 2013

Beauty Foods Face Mask

I know this is not a breakfast, lunch or dinner recipe BUT it's  made with 100% edible ingredients and it's really good for you so I thought it would be a good idea to post it.
It's a face mask suggested to me by my nutritionist, yes, I'm not only studying to become one but am seeing one too and I'm learning lots of new interesting things like this beauty tip.
I'm 100% Italian but 9 years here in England with very little sun, lots of wind and cold weather have had a toll on my skin which is now ultra-sensitive and rosacea prone. I know. Fun times.
This is a super fresh and natural mask with lovely ingredients: oatmeal is very helpful for dry skin, banana is nourishing and full of vitamins, manuka honey has antibacterial properties  and adding 1 capsule of probiotic helps fight the bacteria in your skin and as a consequence helps with breakouts.
I have tried a few masks that are out there and there's always some ingredient that ends up not being too good for you but there are no surprises in this one and my skin is still thanking me for it.
WARNING: It's the messiest mask I have ever tried. My nutritionist did say it but man, I was not prepared for this..Forget the idea of looking like one of those smiling, gorgeous models on Glamour with their mud mask on and colourful pyjamas having a pillow fight in a field of sunflowers.
This is going to be ugly. I looked like Robin Williams in Mrs Doubtfire when he put his face in cream pie and bits of it were falling in someone's coffee cup. So MAKE SURE your hair is pulled back, you're leaning over a sink and ideally alone in the house..Actually the recipe made enough for two so you can have a girlfriend over and just laugh at each other in the process..But when your skin will be soft and glowing...Who will be laughing then ah?
Anyway, enough said.  Here we go:


INGREDIENTS:

Half a banana (you can also substitute with avocado)
1 probiotic capsule (I used GI Flora from Allergy Research)
1 heaped tsp of Manuka honey
1 dessert spoon of Oatmeal (grounded oats)

Just mash the banana and add all the other ingredients

Mix well, apply to face and leave for 15 min. then remove with a hot cloth or simply warm water.
PS: I added 1 more tsp of oats to give it a bit more consistency.


Saturday, 16 March 2013

Love Frittata

I'm guilty.That's right, I'm one of those people that buys way too many fresh vegetables in advance and then doesn't get around to using all of them and by the end of the week an evil smell coming from the refrigerator reminds me how much food is rotting in my veggie drawer...
But all of this is going to change, first of all because I've seen this sign on a van the other night that said LOVEFOODHATEWASTE and it reminded me of how much I actually do waste.And yet I still complain I have no money, it's all spent on food...Well instead of buying too much, dear Valentina, try and actually use up what you have left first and only then buy more food!
So that's what I did yesterday and something wonderful happened..My first very own recipe!No food blogs, no cookbooks, just a phone call to my mom to make sure i was going in the right direction..Bear in mind I'm Italian and the call to my mother would have happened even if hadn't been cooking so i thought i might as well put it to good use..
And so my super duper colourful Love Frittata was born. I've just decided to call it like that first of all because as I was cooking it I sure did put lots of love into it, as I do with everything I cook, I truly believe food tastes so much better if your heart is in it.Not literally.
Secondly because I did bake it in my heart shaped pan, which I really adore and find makes everything look super cute but not as cute as my boyfriend who tasted it as well and gave me his seal of approval.Success!
I used all the vegetables I had left and they worked so well together I decided this was one for the blog.
I had it for dinner and the day after for lunch but it can also be easily eaten as part of a delicious brunch with friends.

So here it is:

RECIPE:
2 Sweet Potatoes, chopped
1 Courgette,chopped
1 Leek,thinly sliced
A handful of spinach, chopped (all I had left in the bag..)
A handful of fresh parsley, chopped
2 garlic cloves
2 tbsp extravirgin olive oil
1tsp dried Mediterranean herbs mix (my grandma gave me mine, I think it's rosemary, origano and thyme.. )
4 eggs
A pinch or two of pink Hymalaian salt (that's what I  had at home but sea salt is perfect as well)
Black pepper to taste

Turn the oven on at 220c, 425F or gas mark 7 (that's what i use as i have a super old gas oven).

First,put the chopped sweet potatoes in a bowl with 1 tbsp of oil, plus a pinch of salt and pepper and some dried herbs but don't worry if you don't have them, it'll work just the same. Toss it all together and then pop it on a baking tray and in the oven for 25-30 min or till the potatoes are nice and soft,half way through move them around so they can cook evenly.
Once they're done, take them out and lower the heat to gas mark 4, 180c, 350F.

Put the garlic cloves in a pan with the oil and when the garlic starts to brown a little, add in the chopped courgettes on a medium heat and kept stirring every now and then for about 10 min till they become soft, add the leeks and let those soften too and last add spinach and parsley and stir for about 2 minutes before turning off the heat.

Put all 4 eggs in a bowl with salt and pepper and whisk.

Now get a baking pan and put all your vegetables in and add the eggs,mix all together and put in the oven for about 20 minutes or until the top is firm.

Take out of the oven and Buon Appetito!

Hope you enjoy it as much as I did.xxx


Sunday, 27 January 2013

Pane e Pomodoro (Bread and Tomatoes)

Ok, here we go.First post on this blog which  I'm still trying to figure out so you'll probably see it changing colour or other features in the next few days..Me and technology never got along really well.
But I'm starting anyway, with the simplest, quickest and most comforting meal ever. 
Pane e Pomodoro. I could eat this every day all day for the rest of my life and never get bored of it. Maybe it's because every time i bite into it I can instantly see the house in Puglia where i spent many summers as a child, sitting under the grapevine looking over our vegetable garden filled with rows of bright red tomatoes and big bushes of rosemary that you could smell from a mile away..The heat, the crickets, the white plastic table where I used to play cards with my grandpa who taught me all the best tricks. He introduced me to pane e pomodoro, actually in Puglia we used to eat Friselle which is a kind of bagel made with durum wheat flour, cut in half and baked. Friselle are crunchy so grandpa used to put them briefly under the water so they'd soften up, then we'd get some cherry tomatoes, cut them in half and squeeze the juice on the Frisella,then drizzle some olive oil, a pinch of salt and voila'!!!
A delicious quick mid afternoon snack..Sometimes i would actually have it as lunch because when the heat got really intense I never  felt like a full on meal. So here it is, very simple and satisfying.

Hope you'll enjoy it as much as i do. 


RECIPE
2 Slices of bread (or more depending on how hungry you are!)
7-8 cherry tomatoes, sliced in half
drizzle of extra virgin olive oil
pinch of salt

Just squeeze the juices of the cherry tomatoes on the bread and if you want,leave the tomatoes on as well, i prefer just the juice but it's really a personal thing.

Drizzle your oil and finish with a sprinkling of salt.

PS: please don't use the sliced packaged bread that you use for toast in the morning as it'll get all soggy and messy, try and get a nice loaf to slice or even a nice wholegrain baguette. In Italy we have pane pugliese which is a typical kind of bread from puglia. I had some nice sliced bread from a bakery called Poilane here in London but i know that's not always available in supermarkets so just get a nice tasty loaf and start eating!